Blog's Page
 Blog's Page
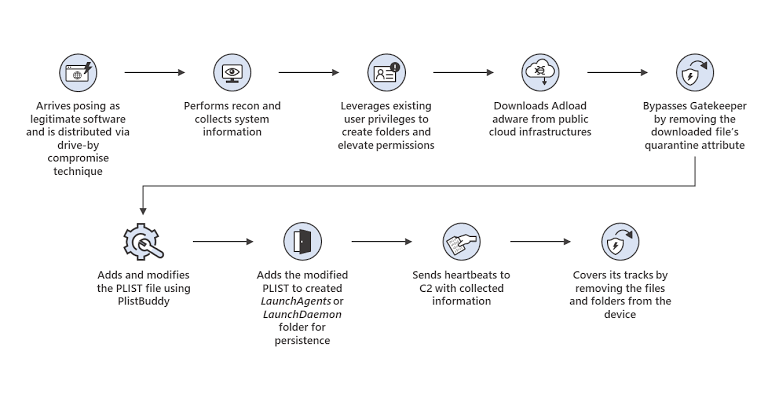
ProgressInitiator Is A Potentially Unwanted Application (PUA) Commonly Associated With Adware Behavior On MacOS. Once Installed, It May Modify Browser Settings, Display Intrusive Advertisements, Generate Redirects, And Interfere With Normal Web Browsing. Users May Notice Unexpected Pop-ups, Promotional Banners, Unfamiliar Search Results, Or Changes To Their Browser Homepage And Search Engine.
Although Adware Is Generally Less Destructive Than Ransomware Or Traditional Malware, Applications Such As ProgressInitiator Can Negatively Affect Privacy, Performance, And The Overall Browsing Experience. Understanding How ProgressInitiator Gets Installed, Recognizing Its Symptoms, And Removing Its Associated Files Can Help Keep A Mac Secure.
ProgressInitiator Mac Adware May Arrive Through Software Bundling, Misleading Advertisements, Questionable Download Websites, Or Deceptive Installation Prompts. Users Sometimes Install Unwanted Applications Without Realizing That Additional Software Is Included In A Seemingly Legitimate Installer. Free Applications, Fake Updates, Pirated Software, And Suspicious Browser Extensions Can Also Be Used To Distribute Potentially Unwanted Programs.
During Installation, Users May Accept Default Settings Without Reviewing The Additional Components Being Offered. This Is Why Downloading Applications From Reputable Sources And Carefully Reviewing Installation Screens Are Important Steps In Preventing Unwanted Software From Reaching A Mac.
One Of The Most Noticeable Signs Of ProgressInitiator Is An Increase In Unwanted Advertising. Affected Users May Encounter Pop-ups, Banners, Coupons, Sponsored Links, Or Redirects While Browsing Websites That Normally Do Not Display Such Content. Browser Searches May Also Produce Unfamiliar Results Or Redirect Through Unexpected Websites Before Reaching The Intended Search Engine.
In Some Cases, The Adware May Cause Browser Performance Problems, Excessive Resource Consumption, Or Frequent Interruptions. These Symptoms Do Not Always Prove That ProgressInitiator Is Installed Because Other Unwanted Applications Can Cause Similar Behavior, But A Combination Of Persistent Advertisements And Unexpected Browser Changes Should Be Investigated.
ProgressInitiator And Similar Adware Applications May Attempt To Influence Browser Configuration. Depending On The Associated Components Installed On The System, This Can Include Changing The Default Search Engine, Homepage, New-tab Behavior, Or Installing Unwanted Extensions.
Such Changes Are Particularly Frustrating Because They Can Remain After The Original Application Has Been Removed If Supporting Components Are Left Behind. Users Should Therefore Inspect Their Installed Browser Extensions And Settings After Removing Suspicious Software. Safari, Chrome, Firefox, And Other Browsers Have Their Own Extension And Configuration Management Areas, So The Exact Cleanup Procedure Can Vary Between Browsers.
Privacy Is Another Important Concern When Dealing With Mac Adware. Ad-supported Applications May Collect Information About Browsing Activity, Visited Websites, Search Queries, Advertising Interactions, Or Technical Characteristics Of The Device. The Exact Information Collected Depends On The Application And Its Associated Services.
Even When An Adware Program Is Not Classified As Highly Dangerous Malware, Unnecessary Tracking Can Create Privacy Concerns. Users Should Avoid Granting Suspicious Applications Unnecessary Permissions And Should Review MacOS Privacy Settings Whenever An Unfamiliar Program Has Been Installed.
To Remove ProgressInitiator Manually, Begin By Checking The ProgressInitiator Mac Applications Folder For Unfamiliar Or Recently Installed Applications. If ProgressInitiator Or Another Suspicious Application Is Present, Close It And Move The Unwanted Application To The Trash. Next, Inspect Browser Extensions And Remove Extensions That You Do Not Recognize Or Intentionally Install.
It Is Also Advisable To Review Browser Settings And Restore The Preferred Homepage And Search Engine If They Have Been Modified. Emptying The Trash After Completing The Removal Process Can Help Eliminate The Main Application, Although Manual Deletion Alone May Not Remove Every Associated Component.
Mac Adware Can Sometimes Maintain Supporting Files In Locations Such As User Library Folders. Advanced Users Can Inspect Locations Such As ~/Library/LaunchAgents, ~/Library/Application Support, And Related Directories For Recently Created Or Suspicious Files.
However, Deleting Unknown System Or Application Files Without Understanding Their Purpose Can Cause Software Problems. Therefore, Users Should Avoid Randomly Removing Files From The Library. If You Are Uncertain About A Particular File, Researching Its Exact Name Or Using A Reputable Security Scanner Is Safer Than Deleting System Components Blindly.
After Removing Suspicious Software, Users Should Restart The Mac And Perform Another Security Check. Run A Reputable, Updated Anti-malware Or Security Application Capable Of Detecting Potentially Unwanted Programs And ProgressInitiator Mac adware. A Security Scan Can Be Particularly Useful When Manual Removal Does Not Resolve Redirects Or Advertisements.
Users Should Also Ensure That MacOS And Their Installed Browsers Are Updated. Security Updates Frequently Address Vulnerabilities That Attackers Or Malicious Websites Can Exploit. Keeping The Operating System, Browsers, And Security Software Current Provides An Additional Layer Of Protection Against Unwanted Applications.
Prevention Is The Best Long-term Strategy For Avoiding ProgressInitiator And Similar Mac Adware. Download Software From Trustworthy Sources And Avoid Suspicious Third-party Download Portals. Do Not Click Unexpected Advertisements Claiming That Your Mac Is Infected Or That An Urgent Update Is Required.
When Installing Legitimate Applications, Choose Custom Or Advanced Installation Options When Available And Carefully Review Every Component Before Continuing. Browser Extensions Should Also Be Installed Selectively Because Unnecessary Extensions Can Increase Privacy And Security Risks. Strong Browsing Habits Combined With Regular Software Updates Can Significantly Reduce The Likelihood Of Unwanted Applications Being Installed.
In Conclusion, ProgressInitiator Mac Adware Is An Unwanted Application That Can Interfere With Browsing Through Advertisements, Redirects, Browser Modifications, And Potentially Unwanted Tracking. While Adware May Not Have The Destructive Capabilities Of Ransomware, It Should Still Be Treated Seriously Because It Can Reduce System Usability And Create Privacy Concerns.
If ProgressInitiator Symptoms Appear, Users Should Remove Suspicious Applications And Extensions, Restore Browser Settings, Check For Associated Components, And Run A Trusted Security Scan. Most Importantly, Careful Software Installation, Reputable Download Sources, Updated Security Software, And Cautious Browsing Habits Can Help Prevent ProgressInitiator And Other Potentially Unwanted Applications From Returning.
Step 1: Boot Into Safe Mode
Restart Your PC And Press F8 (or Shift + F8 For Some Systems) Before Windows Loads.
Choose Safe Mode With Networking.
Safe Mode Prevents Most Malware From Loading.
Press Win + R, Type appwiz.cpl, And Press Enter.
Sort By Install Date And Uninstall Unknown Or Recently Added Programs.
Use A Trusted Anti-malware Tool:
Malwarebytes – https://www.malwarebytes.com
Screenshot Of Malwarebytes - Visit Links
Microsoft Defender – Built Into Windows 10/11
HitmanPro, ESET Online Scanner, Or Kaspersky Virus Removal Tool
ZoneAlarm Pro Antivirus + Firewall NextGen
VIPRE Antivirus - US And Others Countries, | India
Run A Full Scan And Delete/quarantine Detected Threats.
Win + R, Type temp → Delete All Files.Press Win + R, Type %temp% → Delete All Files.
Use Disk Cleanup: cleanmgr In The Run Dialog.
Go To: C:\Windows\System32\drivers\etc
Open hosts File With Notepad.
Replace With Default Content:
Press Ctrl + Shift + Esc → Open Task Manager
Go To Startup Tab
Disable Any Suspicious Entries.
Open Command Prompt As Administrator.
Run These Commands:
netsh Winsock Reset

netsh Int Ip Reset

ipconfig /flushdns
Unwanted Homepage Or Search Engine
Pop-ups Or Redirects
Unknown Extensions Installed
For Chrome:
Go To: chrome://extensions/
Remove Anything Unfamiliar
For Firefox:
Go To: about:addons → Extensions
Remove Suspicious Add-ons
For Edge:
Go To: edge://extensions/
Uninstall Unknown Add-ons
Chrome:
Go To chrome://settings/reset → "Restore Settings To Their Original Defaults"
Firefox:
Go To about:support → "Refresh Firefox"
Edge:
Go To edge://settings/resetProfileSettings → "Reset Settings"
All Browsers:
Use Ctrl + Shift + Del → Select All Time
Clear Cookies, Cached Files, And Site Data
Make Sure They Are Not Hijacked.
Chrome: chrome://settings/search
Firefox: about:preferences#search
Edge: edge://settings/search
Chrome: chrome://settings/cleanup
Use Malwarebytes Browser Guard For Real-time Browser Protection.
Always Download Software From Trusted Sources.
Keep Windows, Browsers, And Antivirus Updated.
Avoid Clicking Suspicious Links Or Ads.
Use ad Blockers And reputable Antivirus Software.
Backup Your Files Regularly.
To Remove Malware From Your Windows PC, Start By Booting Into Safe Mode, Uninstalling Suspicious Programs, And Scanning With Trusted Anti-malware Tools Like Malwarebytes. Clear Temporary Files, Reset Your Network Settings, And Check Startup Apps For Anything Unusual.
For web Browsers, Remove Unwanted Extensions, Reset Browser Settings, Clear Cache And Cookies, And Ensure Your Homepage And Search Engine Haven’t Been Hijacked. Use Cleanup Tools Like Chrome Cleanup Or Browser Guard For Added Protection.
?? Prevention Tips: Keep Software Updated, Avoid Suspicious Downloads, And Use Antivirus Protection Plus Browser Ad Blockers. Regular Backups Are Essential.
Why It Matters: Not All VPNs Offer Malware Protection.
What To Look For: Providers With built-in Malware/ad/tracker Blockers (e.g., NordVPN’s Threat Protection, ProtonVPN’s NetShield).
Purpose: Prevents Data Leaks If Your VPN Connection Drops.
Benefit: Ensures Your Real IP And Browsing Activity Aren’t Exposed To Malware-distributing Websites.
Why It Matters: DNS Leaks Can Expose Your Online Activity To Attackers.
Solution: Enable DNS Leak Protection In Your VPN Settings Or Use A Secure DNS Like Cloudflare (1.1.1.1).
Risk: Free VPNs Often Contain Malware, Sell User Data, Or Lack Security Features.
Better Option: Use Reputable Paid VPNs That Offer security Audits And Transparent Privacy Policies.
Some VPNs Block Known Phishing And Malicious Sites.
Example: Surfshark’s CleanWeb, CyberGhost’s Content Blocker.
Reason: Security Patches Fix Known Vulnerabilities.
Tip: Enable Auto-updates Or Check For Updates Weekly.
Scope: Malware Can Enter Through Phones, Tablets, Or IoT Devices.
Solution: Install VPN Apps On Every Internet-connected Device.
Fact: VPNs Do Not Remove Or Detect Malware On Your System.
Complement It With:
Antivirus Software
Firewall
Browser Extensions For Script Blocking
VPN Encrypts Traffic But Can’t Stop Malware From Executing If You Download Infected Files.
Split Tunneling Allows Certain Apps/sites To Bypass VPN.
Tip: Never Exclude Browsers, Email Clients, Or Download Managers From VPN Tunneling.
A VPN (Virtual Private Network) Enhances Your Online Privacy By Encrypting Your Internet Traffic And Masking Your IP Address. It Protects Your Data On Public Wi-Fi, Hides Browsing Activity From Hackers And ISPs, And Helps Bypass Geo-restrictions. VPNs Also Add A Layer Of Defense Against Malware By Blocking Malicious Websites And Trackers When Using Advanced Features. However, A VPN Does Not Remove Existing Malware Or Act As Antivirus Software. For Full Protection, Combine VPN Use With Antivirus Tools, Regular Software Updates, And Cautious Browsing Habits. Always Choose A Reputable VPN Provider With Strong Security And Privacy Policies.
ProgressInitiator Mac Adware, Remove ProgressInitiator Mac Adware, Delete ProgressInitiator Mac Adware, Get Rid Of ProgressInitiator Mac Adware, Progr