Blog's Page

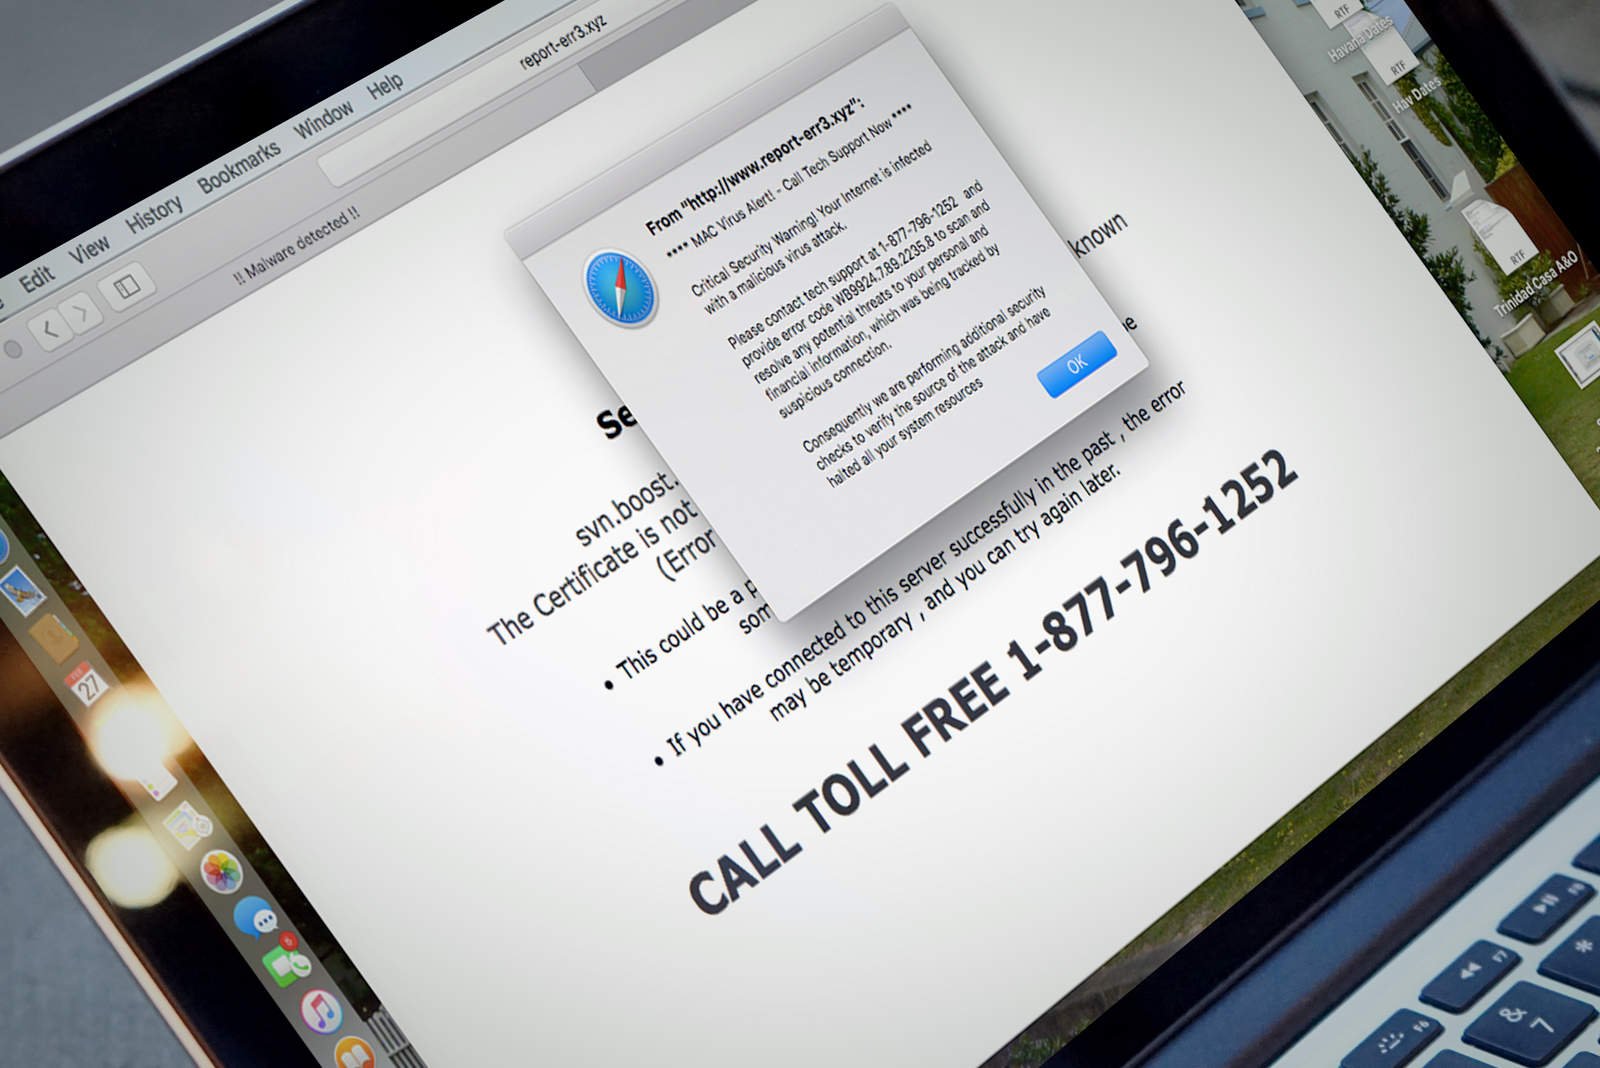
DisplayExplorer Is A Form Of Adware That Targets Mac Computers, Often Disguising Itself As A Helpful Tool Or Utility. It Typically Infiltrates Systems Through Bundled Software Installers, Fake App Updates, Or Deceptive Websites That Trick Users Into Downloading It. Once Installed, DisplayExplorer Embeds Itself Into Web Browsers Like Safari, Chrome, Or Firefox And Begins Delivering Unwanted Ads, Pop-ups, And Redirects.
The Main Purpose Of DisplayExplorer adware Is To Generate Revenue Through Advertisements. It Modifies Browser Settings, Changes Your Homepage Or Search Engine, And Displays Excessive Ads That Interrupt Browsing. These Ads May Lead To Malicious Websites, Fake Software Downloads, Or Phishing Pages Designed To Steal Personal Information.
In Addition To Causing Browser Disruptions, DisplayExplorer Can Track Your Online Activity, Including Browsing History, Search Terms, IP Address, And Other Sensitive Data. This Data Is Often Shared With Third Parties For Targeted Advertising Or Sold To Marketing Networks, Posing A Serious Privacy Risk.
Go To System Preferences > Profiles And Remove Suspicious Profiles.
Delete DisplayExplorer From The Applications Folder.
Reset Browser Settings To Default.
Use A Trusted Anti-malware Tool To Clean Your Mac Completely.
Timely Removal Of DisplayExplorer Is Essential To Restore Privacy And System Stability.
Removing Malware From A Windows Computer Involves A Combination Of Using Antivirus Or Anti-malware Tools, Performing System Scans, And Taking Manual Actions To Eliminate The Malicious Software. Here's A Step-by-step Guide:
Ctrl + Shift + Esc To Open Task Manager.Win + R To Open The Run Dialog, Type cleanmgr, And Press Enter.Remember To Maintain Good Security Practices, Such As Keeping Your Operating System And Software Up-to-date, Using A Reputable Antivirus Program, And Being Cautious When Clicking On Links Or Downloading Files From The Internet. Regularly Backing Up Your Important Data Is Also Crucial To Mitigate The Impact Of Potential Infections.
Malware Can Silently Infect Your System, Steal Personal Information, Or Slow Down Performance. One Of The Most Trusted Tools To Eliminate Malware Is Malwarebytes—a Powerful, User-friendly Anti-malware Solution. Follow This Guide To Detect And Remove Malware From Your Computer.
Go To The Official Malwarebytes Website.
Click “Free Download” To Get The Installer.
Save The Setup File To Your Computer.
Double-click The Downloaded Installer File (usually Named MBSetup.exe).
Follow The On-screen Instructions:
Choose Personal Computer Or Work Computer.
Select Either The Free Version Or Start A Premium Trial.
Click Finish After Installation.
Before Scanning, Ensure Malwarebytes Is Using The Latest Malware Definitions:
Open Malwarebytes.
Click On The Settings Gear Icon.
Go To The General Tab And Check For Updates.
If Updates Are Available, Allow Them To Install.
On The Malwarebytes Dashboard, Click The Scan Button.
The Scan May Take A Few Minutes To Complete Depending On System Size.
Malwarebytes Will Search For:
Viruses
Trojans
Spyware
Adware
Potentially Unwanted Programs (PUPs)
When The Scan Finishes, You’ll See A Summary Of Detected Threats.
Click Quarantine To Remove Them.
If Needed, Review The List Of Quarantined Items And Delete Them Permanently.
Some Threats May Require A System Reboot To Be Fully Removed:
Follow The Prompt To Restart Your Computer.
After Rebooting, Open Malwarebytes To Confirm Removal Success.
Enable Real-Time Protection (Premium Version) For Ongoing Protection.
Schedule Regular Scans Weekly To Catch Threats Early.
Keep Malwarebytes And Your Operating System Updated.
Malwarebytes Is A Reliable And Effective Tool To Remove Malware From Windows And MacOS Systems. With Its Robust Scanning Engine And Simple Interface, It Provides Peace Of Mind Against Digital Threats. For Complete Protection, Consider Upgrading To The Premium Version.
Bitdefender Is A Top-rated Antivirus And Antimalware Solution Trusted By Millions Worldwide. It Offers Advanced Real-time Protection, Behavioral Detection, And Machine-learning-based Malware Removal. If Your Device Is Infected, This Guide Will Help You Clean It Using Bitdefender Security Software.
Go To The Official Bitdefender Website: Click Here
Click “Protect Now” Or Select A Version Like Bitdefender Antivirus Plus Or Bitdefender Total Security.
Sign Up Or Log In To Your Bitdefender Central Account.
Download The Bitdefender Installer And Run It.
Follow The On-screen Instructions To Complete The Installation.
Open Bitdefender Central From Your Browser.
Go To My Subscriptions > Activate Code If You Have A License Key.
Once Activated, Open The Bitdefender App On Your PC Or Mac—it Will Link Automatically.
Before Scanning, Make Sure Your Malware Definitions Are Current:
Launch Bitdefender.
Click The Update Tab Or Let It Auto-update.
Wait For The Virus Definitions And Program To Be Fully Updated.
In The Bitdefender Dashboard, Go To The Protection Tab.
Click System Scan For A Deep And Complete Scan Of Your Device.
You Can Also Select Quick Scan For Faster Results Or Custom Scan For Specific Folders Or Drives.
When The Scan Completes, Bitdefender Will Show A List Of Detected Malware.
Click Take Action Or Resolve All To Quarantine Or Delete Threats.
Review And Confirm Actions Taken In The Notifications Or Threat Defense Panel.
Some Malware Requires A System Restart To Be Fully Removed.
Follow Any On-screen Prompts From Bitdefender And Reboot Your PC.
Keep Real-Time Protection And Advanced Threat Defense Turned On.
Enable Web Protection And Ransomware Remediation For Added Safety.
Use The Vulnerability Scan To Patch Outdated Apps Or Weak System Settings.
Bitdefender Security Software Offers Industry-leading Protection Against Malware, Ransomware, And Phishing Attacks. Its Smart Scan Engine, Automatic Updates, And Real-time Defense Make It An Excellent Tool For Cleaning And Securing Your System. For Ongoing Peace Of Mind, Make Sure To Keep The Software Active And Schedule Regular Scans.
NordVPN Is A Premium VPN Service Known For Its Speed, Security, And Strong No-logs Policy. It Helps You:
Browse Anonymously
Access Geo-blocked Content
Secure Data On Public Wi-Fi
Hide Your IP Address
Go To: https://nordvpn.com
Click Download And Choose Your Platform.
Run The Installer And Follow Setup Instructions.
Login With Your Nord Account Or Create One.
Once Installed, NordVPN Will Be Available In The System Tray/menu Bar.
Open The Google Play Store Or Apple App Store.
Search For NordVPN.
Install And Open The App.
Sign In Or Create An Account.
Open The NordVPN App.
Use The Quick Connect Button For The Fastest Server.
Or Choose From The map Or Country List Manually.
To Access A Geo-blocked Service, Select A Server In The Target Country.
Use Specialty Servers:
Double VPN: Extra Encryption.
Onion Over VPN: For Tor Access.
P2P: For Torrenting.
Use The Kill Switch And Threat Protection Features For Extra Security.
Hide.me Is A Privacy-focused VPN With Both Free And Premium Plans. It Offers:
Strict No-logs Policy
AES-256 Encryption
Customizable Protocols (IKEv2, OpenVPN, WireGuard)
Up To 10 Simultaneous Connections (paid)
Visit https://hide.me
Click Get Free VPN Or Download.
Choose Your OS And Download The Installer.
Run The Installer And Complete Setup.
Log In Or Create A Hide.me Account (free Version Includes 10 GB/month Data).
Go To Your App Store And Search For Hide.me VPN.
Download And Install The App.
Sign In With Your Credentials Or Use The anonymous Mode.
Open The Hide.me App.
Choose A Server Location From The List (Free Users Get Limited Options).
Tap Connect.
Use The Settings To Switch VPN Protocols Or Enable:
Stealth Guard (kills Apps If VPN Drops)
Split Tunneling (route Specific Apps Through VPN)
To Stream Or Torrent, Switch To Streaming Or P2P-optimized Servers (Premium Only).
| Feature | NordVPN | Hide.me VPN |
|---|---|---|
| Server Locations | 60+ Countries | 75+ Locations |
| Free Plan | ? No | ? Yes (10 GB/month) |
| Streaming Support | ? Yes (Netflix, Etc.) | ? Yes (Limited) |
| Simultaneous Devices | 6 | 10 |
| Speed | Very High | High |
| Encryption | AES-256 | AES-256 |
Keep Both VPN Apps Updated For New Security Features.
Always Disconnect When Switching Networks.
Use Auto-connect On Startup For Full-time Protection.
A VPN (Virtual Private Network) Is A Technology That Creates A Secure, Encrypted Connection Between Your Device And The Internet. It Hides Your IP Address, Protects Your Online Activities From Hackers, And Allows Access To Geo-restricted Content.
Key Benefits:
Privacy: Keeps Your Data Private On Public Wi-Fi.
Security: Encrypts Internet Traffic To Prevent Spying.
Anonymity: Masks Your Real IP Address.
Access: Unblocks Websites And Streaming Services.
Popular VPN Services Include NordVPN, ExpressVPN, And Hide.me VPN.
DisplayExplorer Mac Adware Removal, Delete DisplayExplorer Mac Adware, Uninstall DisplayExplorer Mac Adware, Get Rid Of DisplayExplorer Mac Adware